Chris Padilla/Blog
My passion project! Posts spanning music, art, software, books, and more
You can follow by RSS! (What's RSS?) Full archive here.
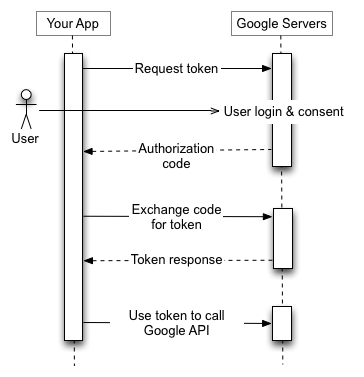
- The user clicks the "Sign in with Google Button"
- From there, they select their account, sign in, and provider permission to your app.
- An Authorization code is sent back to your app
- The authorization code is then used in another round to get tokens from Google Servers.
- Refresh and access tokens are returned from that server
- These are stored with your application for using the Google API.
February Blues
Ate too many leftover holiday cookies last month, now I have the blues!
Make it so, Number One
Understanding Tokens in OAuth Authentication
Signing in is simple, right? Check credentials from the client and they're good to go.
Not so! Especially when using a third party sign in provider like Google, GitHub, or Facebook.
I've gone through a couple of rounds implementing OAuth sign in. The biggest hurdle when having to handle some of that flow yourself is keeping track of the steps. Here today, I'll break down the how and why:
Sign In Flow

To break down the illustration above:
Largely, if you're using a library like Next Auth or Meteor.js' sign in flow, you may have some of the flow already taken care of. More than likely, though, you'll be managing the refresh and access token yourself when using Google's APIs.
API Integrations
The main benefit of signing in with an external provider is integration with your application. This could be sharing a post to Instagram, saving Spotify Playlists, or sending a generated message through gmail. From the flow above, this is where our tokens come into play.
To do that, you'll likely need to request permissions in the first step above. Google, for example, limits integration by the scopes requested from the app. You user will have to review, for example, read write access Instagram when signing in.
Once approved, the access token is short lived and will grant you access to those specific api actions. Lasting only a few minutes, they are meant for immediate use.
After expiring, the refresh token is used to request a new access token.
The reason for this dance is to mitigate the security challenges of token based authorization while also keeping the main benefit of performance at scale. I wrote a bit about this recently in my review of Database vs JWT authorization strategies.
Essentially: When an access token is given, it's difficult to invalidate it. The token is signed and verified and ready for use. Refresh tokens, however, may have some additional back end logic. A refresh token can be verified, then run through checks to see if the request has any reason to be denied ("sign me out on all devices," suspicious behavior, etc.)
While not being "stateless," this is much easier to scale than a database session. Every instance is stored in a db for that strategy, but only expired refresh tokens are marked in a system that uses a token strategy.
In Practice
At this point, you may be saying "Ok! Show me the code!"
I'll point you to the next auth docs for what this looks like in their system. The library doesn't handle token refreshing, but they've documented what it could possibly look like in your own implementation:
The key thing: check for expiration, then send a request when needed.
if (Date.now() < token.accessTokenExpires) {
    return token
}

// Access token has expired, try to update it
return refreshAccessToken(token)
This check can be done on each session access, though, more than likely, it would be more performant to do this just before the integration funcionality.
Lynes – Sonatina in C
Noodling!

